Web Console Guide
Complete user guide for the mcctl-console web management interface -- a modern, full-featured dashboard for managing Docker Minecraft servers from your browser.
Overview
The mcctl-console is a Next.js web application that provides a graphical interface to every aspect of your Minecraft server infrastructure. Instead of running CLI commands, you can manage servers, worlds, players, backups, audit logs, and routing through an intuitive dark-themed UI with real-time updates powered by Server-Sent Events (SSE).
Default URL: http://localhost:5000
Architecture
mcctl-console uses a Backend-for-Frontend (BFF) proxy pattern for secure API communication:
+------------------+      +-------------------+      +---------------+
|   Web Browser    | ---> |   mcctl-console   | ---> |   mcctl-api   |
|   (React/Query)  |      |   (Next.js BFF)   |      |   (Fastify)   |
+------------------+      +-------------------+      +---------------+
       ^                          |
       |                   Session Auth +
       |                   X-API-Key forwarding
       |
   React Query
   (auto-refresh)
Why BFF Proxy?
- Security: API keys stay server-side, never exposed to the browser
- Session Management: Better Auth handles user authentication with JWT tokens
- Type Safety: Shared TypeScript interfaces between frontend and backend
- Caching: React Query provides optimistic updates and intelligent caching
Accessing the Console
First Time Login
-
Start the Management Console services:
-
Open your browser and navigate to
http://localhost:5000 -
Enter your credentials:
- Username: The admin username created during
mcctl console init -
Password: The admin password
-
Click Sign In
Session Persistence
Your session will persist for 24 hours by default. Refresh tokens are used to extend active sessions automatically. Click Sign Out in the user avatar menu (top-right corner) to end your session manually.
Dashboard
The Dashboard is your command center -- it gives you an at-a-glance overview of your entire Minecraft server infrastructure.
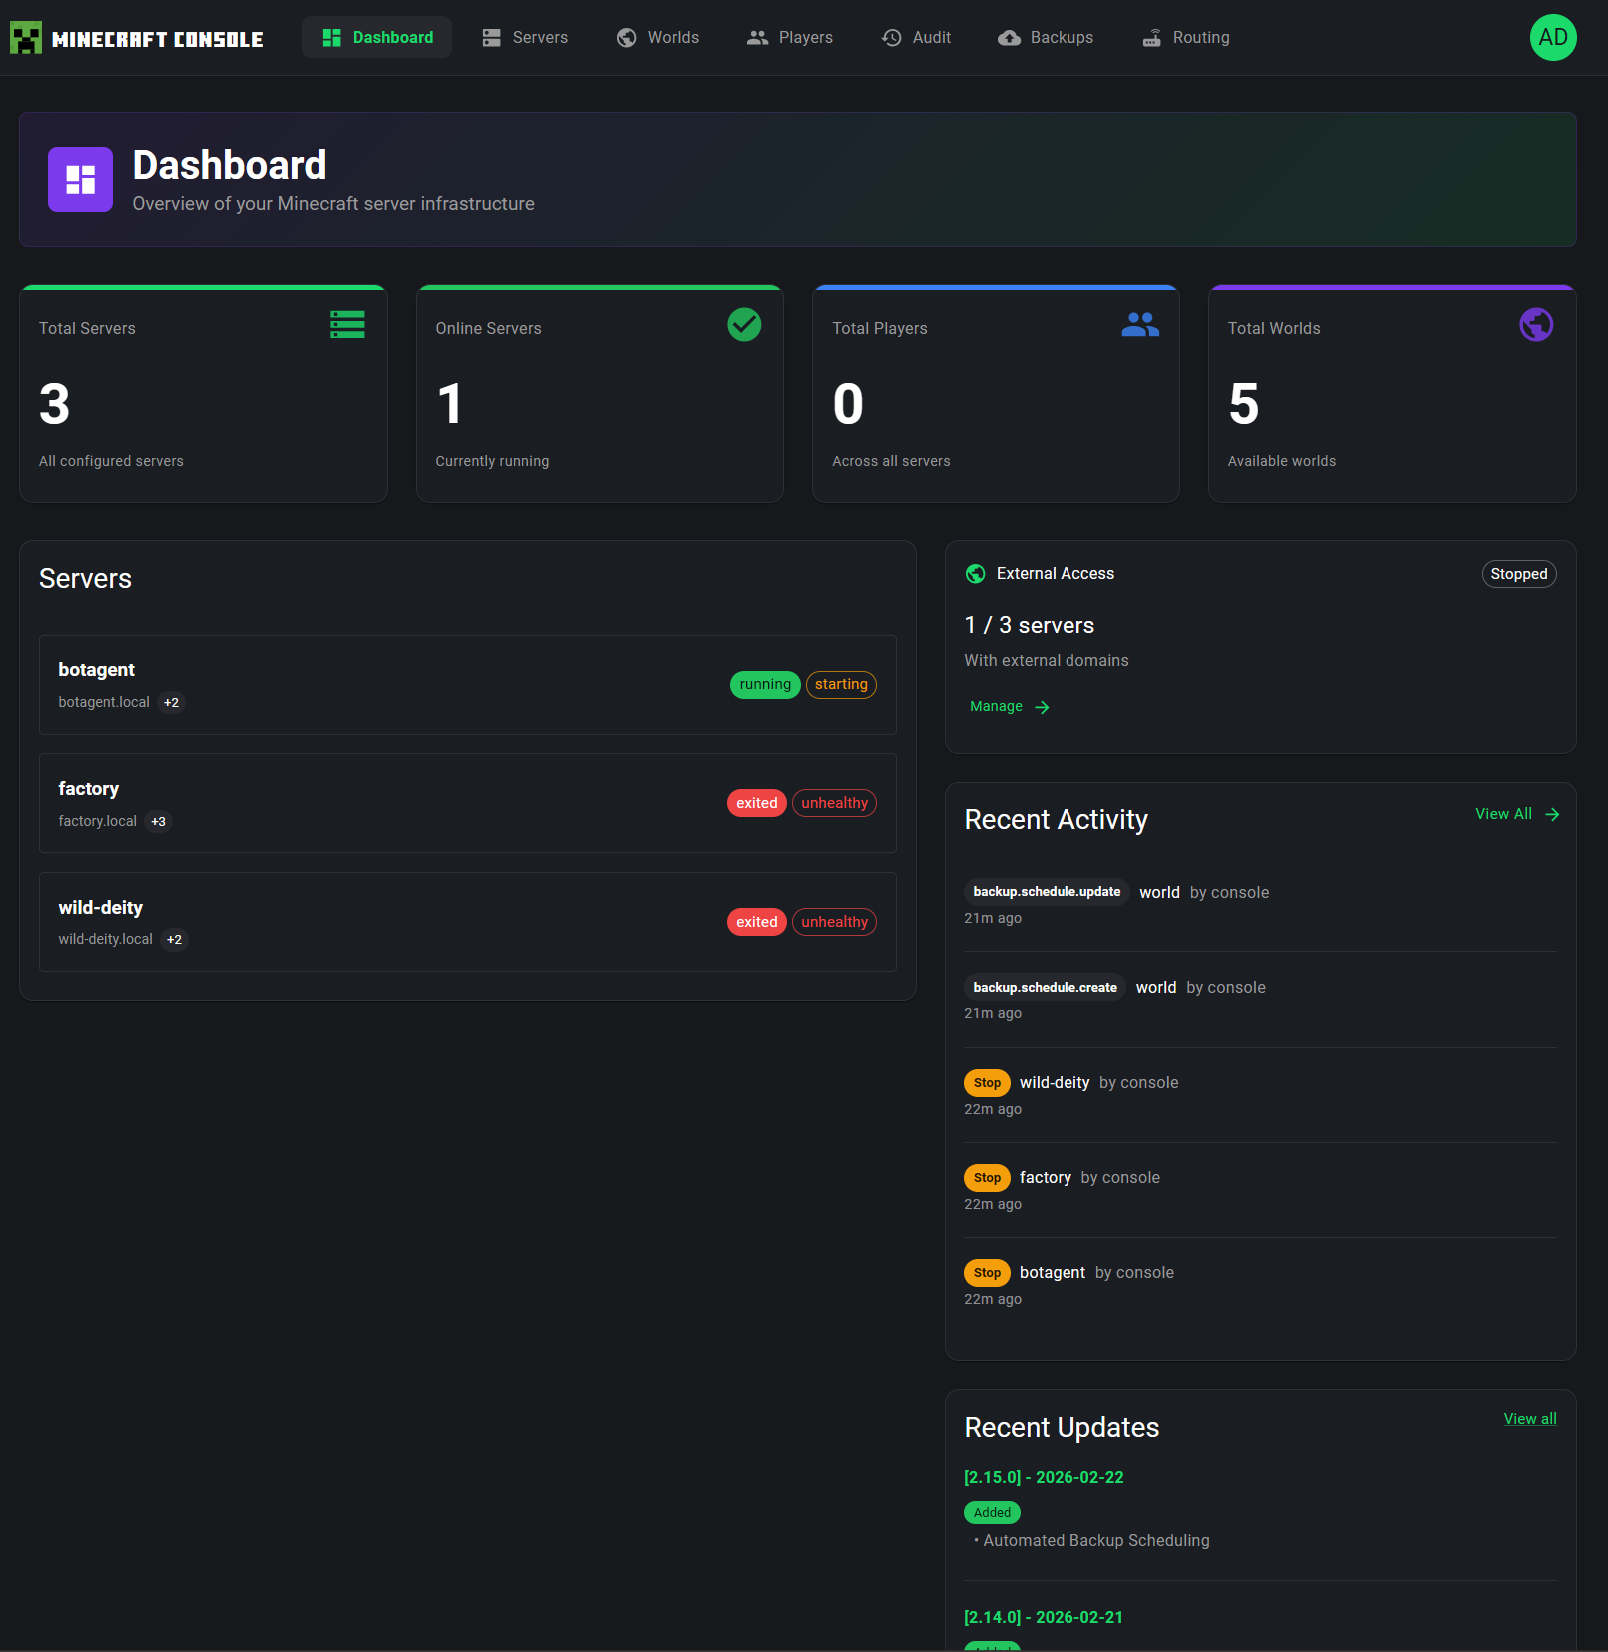
Statistics Cards
At the top of the Dashboard, four statistics cards provide key metrics:
| Card | Description |
|---|---|
| Total Servers | The total number of configured Minecraft servers across your platform |
| Online Servers | How many servers are currently in a running state (updated in real-time via SSE) |
| Total Players | The aggregate player count across all running servers |
| Total Worlds | The total number of available worlds in your world storage |
Servers Panel
The left side of the Dashboard displays a Servers panel listing each server with:
- Server name and hostname (e.g.,
botagent.local) - Player count badge showing how many players are connected
- Status badges -- color-coded tags such as
running,starting,exited,unhealthy, orstopped
Click on any server name to navigate directly to its detail page.
External Access Card
On the right side, the External Access card shows your playit.gg tunnel status:
- How many servers have external domains configured (e.g., "1 / 3 servers")
- Current agent status (
RunningorStopped) - A Manage link to navigate to the Routing page for detailed configuration
Recent Activity Feed
The Recent Activity feed displays the latest management actions performed on your servers, such as:
- Server start/stop events
- Backup schedule changes
- Configuration modifications
- Player management actions
Each entry shows the action type (with a color-coded badge), the target server or resource, who performed the action, and how long ago it occurred. Click View All to navigate to the full Audit Log page.
Recent Updates Feed
The Recent Updates section shows the latest version changelog entries for the mcctl platform itself, so you can quickly see what features have been added or bugs have been fixed in recent releases.
Servers
The Servers page is where you manage all your Minecraft servers.
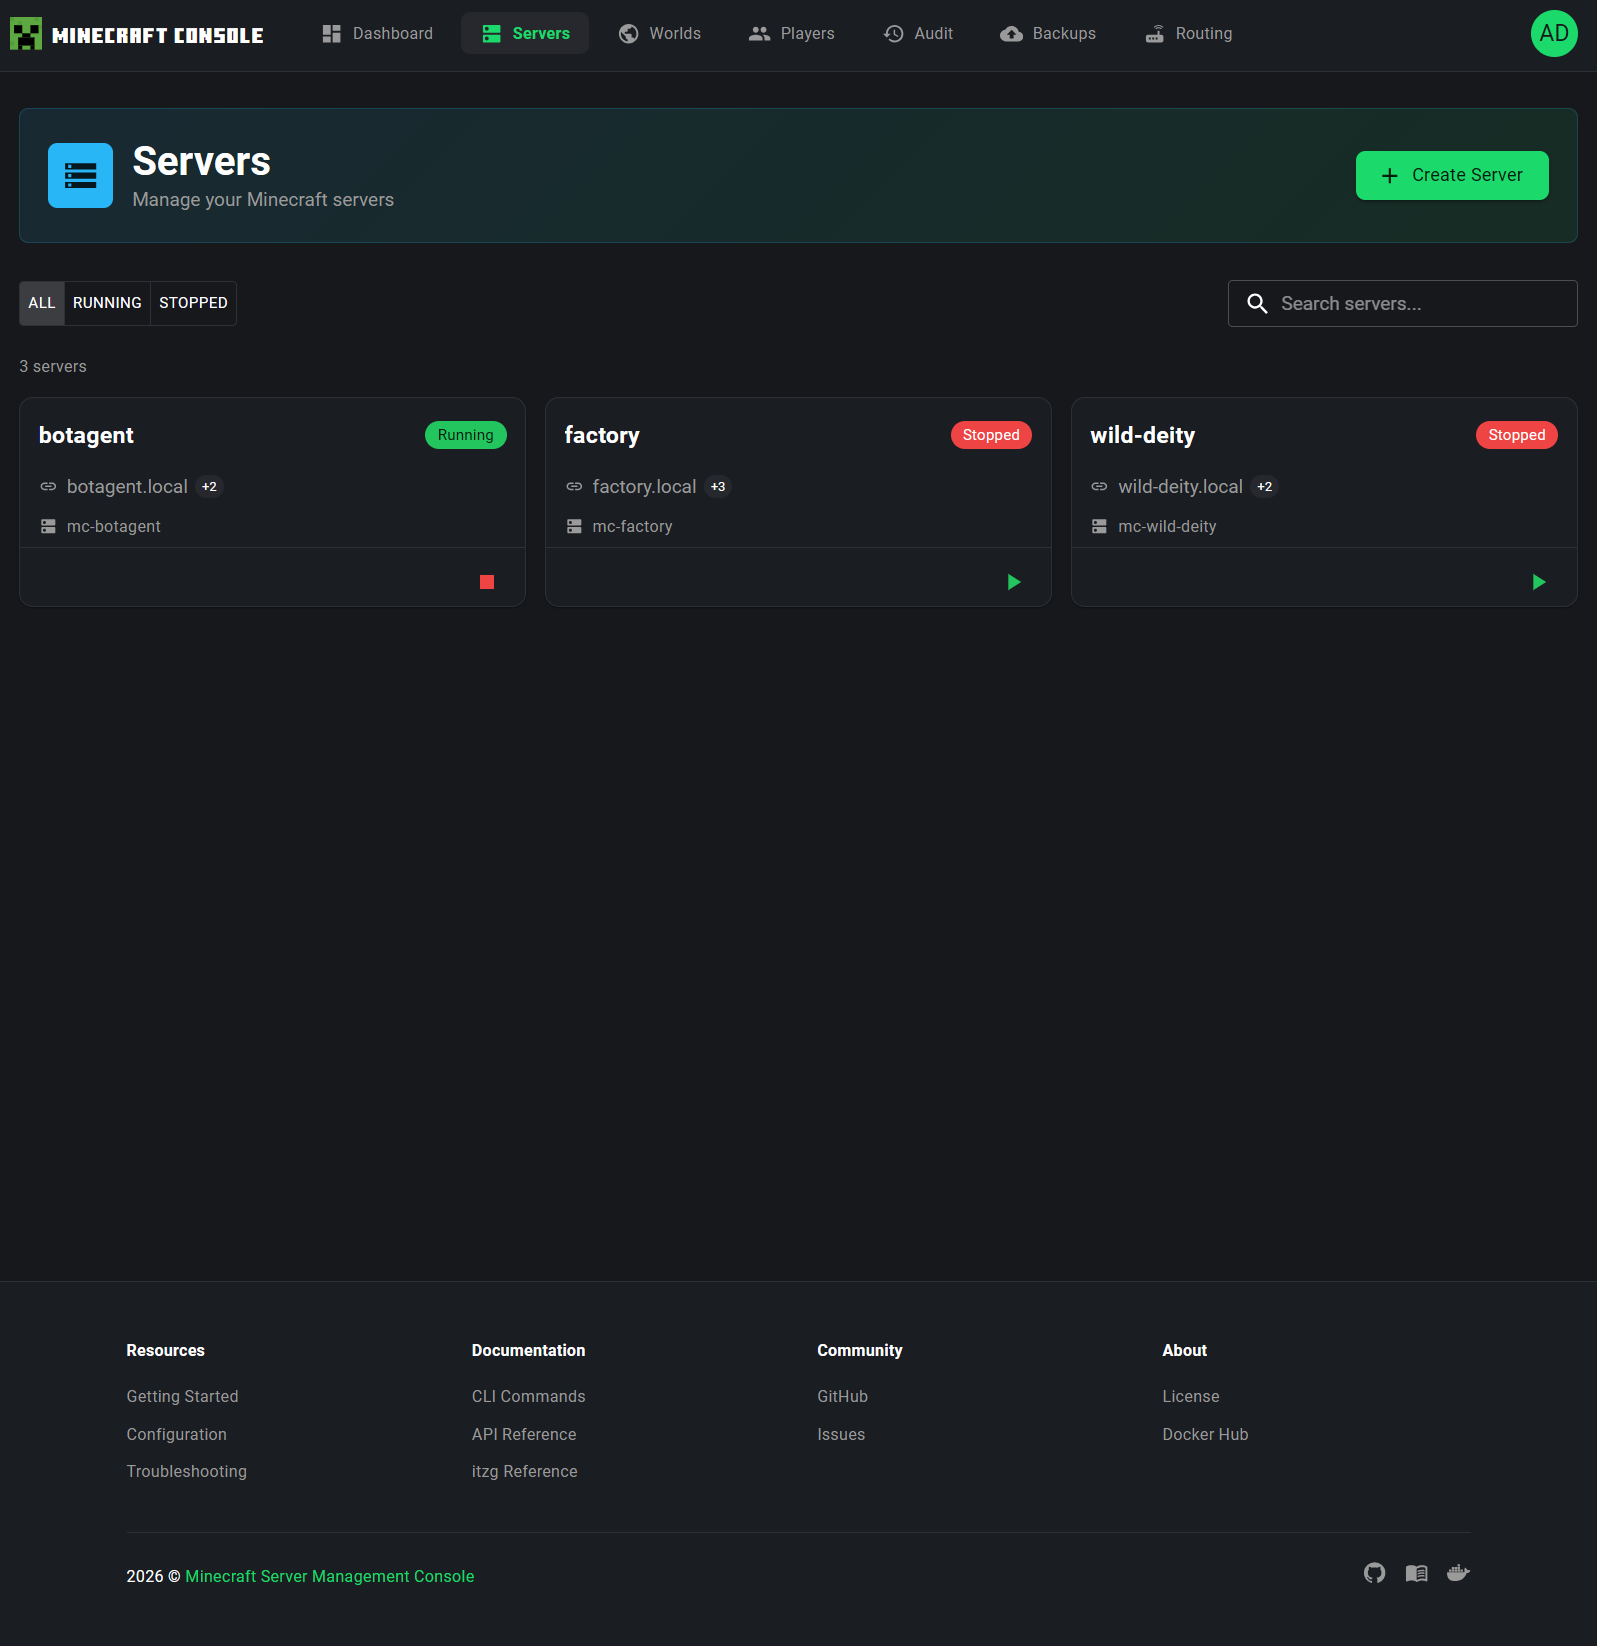
Server List
The page displays all configured servers as cards in a grid layout. Each server card shows:
- Server name (e.g.,
botagent,factory,wild-deity) - Status badge --
Running(green) orStopped(red) - Hostname with the number of configured hostnames (e.g.,
botagent.local +2) - Container name (e.g.,
mc-botagent) - Quick action button -- Play (start) or Stop button in the bottom-right corner
Filtering and Search
At the top of the page, you can filter servers by status:
- ALL -- Show all servers
- RUNNING -- Show only running servers
- STOPPED -- Show only stopped servers
A Search box on the right allows you to filter servers by name in real time.
Creating a New Server
Click the + Create Server button in the page header to open the server creation dialog. The dialog guides you through:
- Server name -- A unique identifier for your server
- Server type -- PAPER, VANILLA, FORGE, NEOFORGE, FABRIC, etc.
- Minecraft version -- Select the desired game version
- Memory allocation -- How much RAM to assign
- Additional options -- World name, seed, and other configuration
The creation process uses Server-Sent Events to show real-time progress as the server container is being set up.
Server Detail Page
Click on any server card to open the detailed server management view. The detail page features:
Header Section
- Server name, type, version, and hostname information
- Stop and Restart buttons for server lifecycle control
- Status badge showing the current server state
Resource Monitoring
Three stat cards display real-time resource usage:
- CPU Usage -- Current CPU utilization percentage (with a circular progress indicator)
- Memory Usage -- Current RAM consumption as a percentage of allocated memory
- World Size -- The disk space used by the current world
Navigation Tabs
The server detail page is organized into seven tabs:
| Tab | Description |
|---|---|
| Overview | Server console with live log output and RCON command input |
| Activity | Per-server audit history showing all actions performed on this server |
| Mods | Mod management -- search, install, and remove mods from Modrinth |
| Files | Full file manager for browsing, editing, uploading, and downloading server files |
| Backups | Server-specific backup information |
| Access | User permission management -- grant, modify, or revoke access per user |
| Options | Server configuration editor with hostname management and game settings |
Overview Tab
The Overview tab is the default view when you open a server's detail page. It serves as a real-time command center for monitoring and interacting with your server.
Console
The centerpiece of the Overview tab is the Console panel, which provides direct access to the server's live log output and command interface:
- Live Log Stream -- The console displays server log messages in real time, including timestamped entries for server events such as world loading, player connections, RCON initialization, and game state changes. Each log line includes the timestamp and log level (e.g.,
INFO) for easy troubleshooting. - Command Input -- At the bottom of the console, the "Send a command" input field lets you execute any Minecraft server command directly via RCON. Type a command (e.g.,
say Hello!,gamemode creative Player1,time set day) and press Enter to send it to the server. The command output appears in the log stream above. - Auto-Scroll -- The console automatically scrolls to show the latest log entries as they arrive, so you always see the most recent server activity.
Console Commands
The console supports all standard Minecraft server commands. You do not need to prefix commands with / -- simply type the command name and its arguments directly (e.g., whitelist add Player1).
Server Information
The Server Information panel on the bottom-left displays essential details about the server configuration and runtime status:
| Field | Description |
|---|---|
| Name | The server's display name (e.g., botagent) |
| Container | The Docker container name (e.g., mc-botagent) |
| Hostname | The primary hostname for client connections (e.g., botagent.local) |
| Type | The server platform type (VANILLA, PAPER, FORGE, NEOFORGE, FABRIC, etc.) |
| Version | The Minecraft game version (e.g., 1.21.11) |
| Memory | The allocated JVM memory (e.g., 2G) |
| Uptime | How long the server has been running since its last start |
Players
The Players panel on the bottom-right shows the list of players currently connected to the server. When no players are online, it displays "Player information unavailable" or an empty state. When players are connected, their Minecraft usernames and avatars are shown here for quick reference.
Mods Tab
The Mods tab provides a complete mod management interface for servers running modded platforms (FORGE, NEOFORGE, FABRIC). This tab allows you to browse, install, and remove mods directly from the Modrinth repository without manual file management.
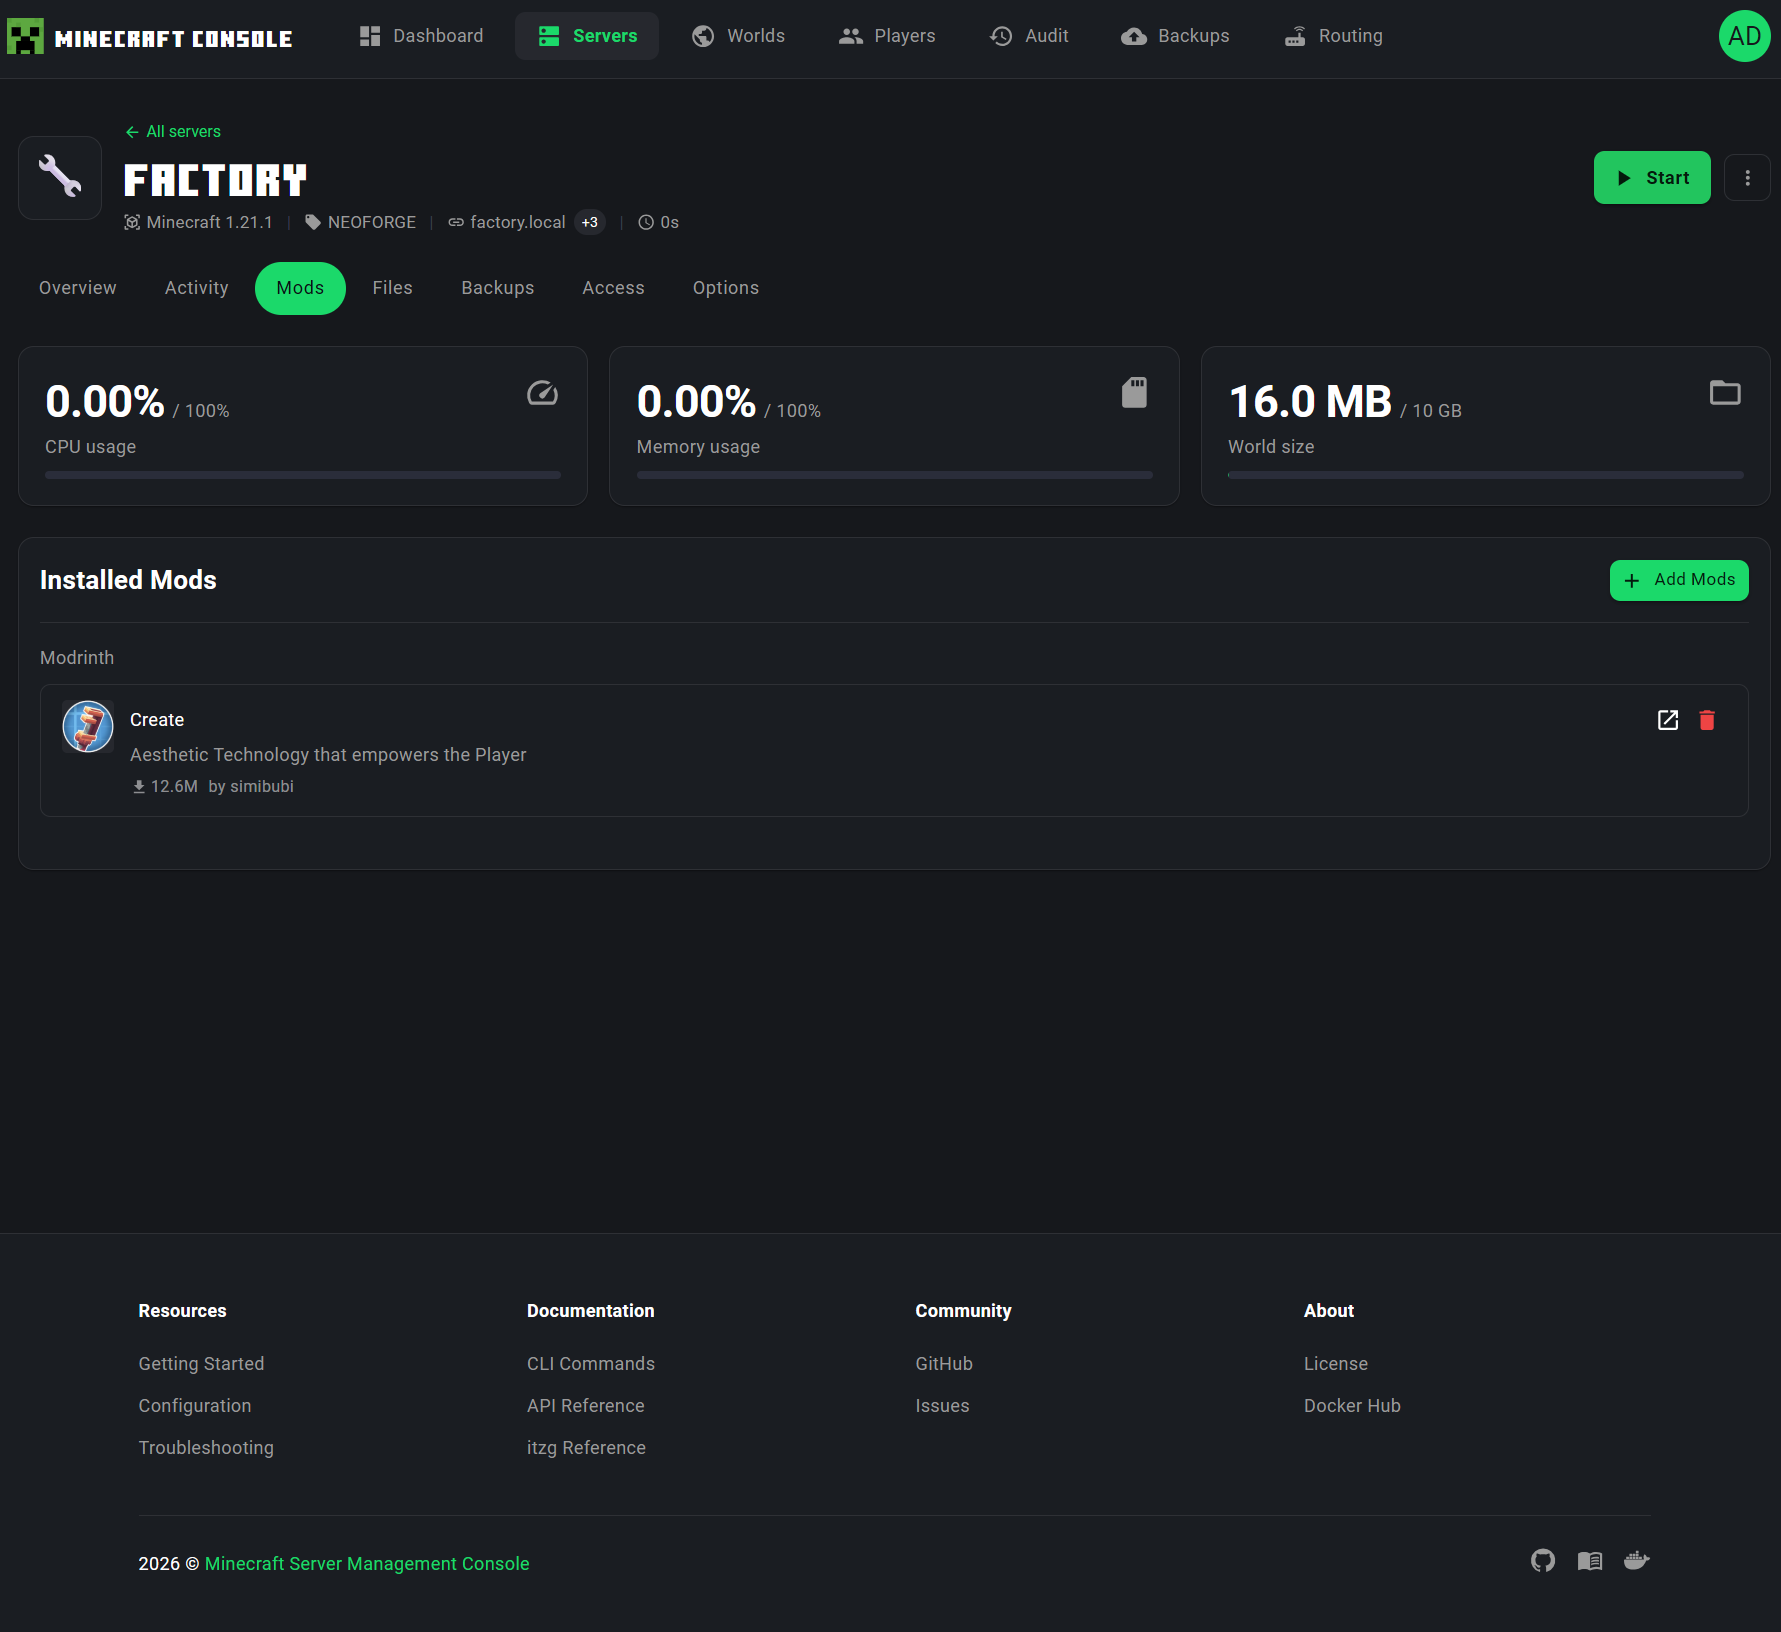
Modded Servers Only
The Mods tab is most useful for modded server types (FORGE, NEOFORGE, FABRIC). While the tab is visible for all servers, mod installation requires a compatible server platform.
Installed Mods
The Installed Mods section lists all mods currently installed on the server:
- Source badge -- Indicates the mod source (e.g.,
Modrinth) - Mod icon -- The mod's thumbnail image from Modrinth
- Mod name -- The display name of the mod (e.g.,
Create) - Description -- A brief summary of what the mod does (e.g., "Aesthetic Technology that empowers the Player")
- Download count -- The total number of downloads on Modrinth (e.g.,
12.6M), indicating the mod's popularity - Author -- The mod creator's username (e.g.,
simibubi) - Edit button (external link icon) -- Opens the mod's page on Modrinth in a new tab for detailed information, changelogs, and documentation
- Delete button (red trash icon) -- Removes the mod from the server after a confirmation prompt
Adding New Mods
Click the + Add Mods button in the top-right corner of the Installed Mods section to open the mod search dialog. The search interface lets you:
- Search for mods by name or keyword on Modrinth
- Filter results by compatibility with your server's Minecraft version and mod loader
- Preview mod details including description, version history, and dependencies
- Install selected mods with a single click -- the system automatically downloads the correct version for your server
Server Restart Required
After installing or removing mods, you need to restart the server for the changes to take effect. The UI will prompt you to restart when mod changes are detected.
Server Files
The Files tab provides a full-featured file manager for your server's file system.
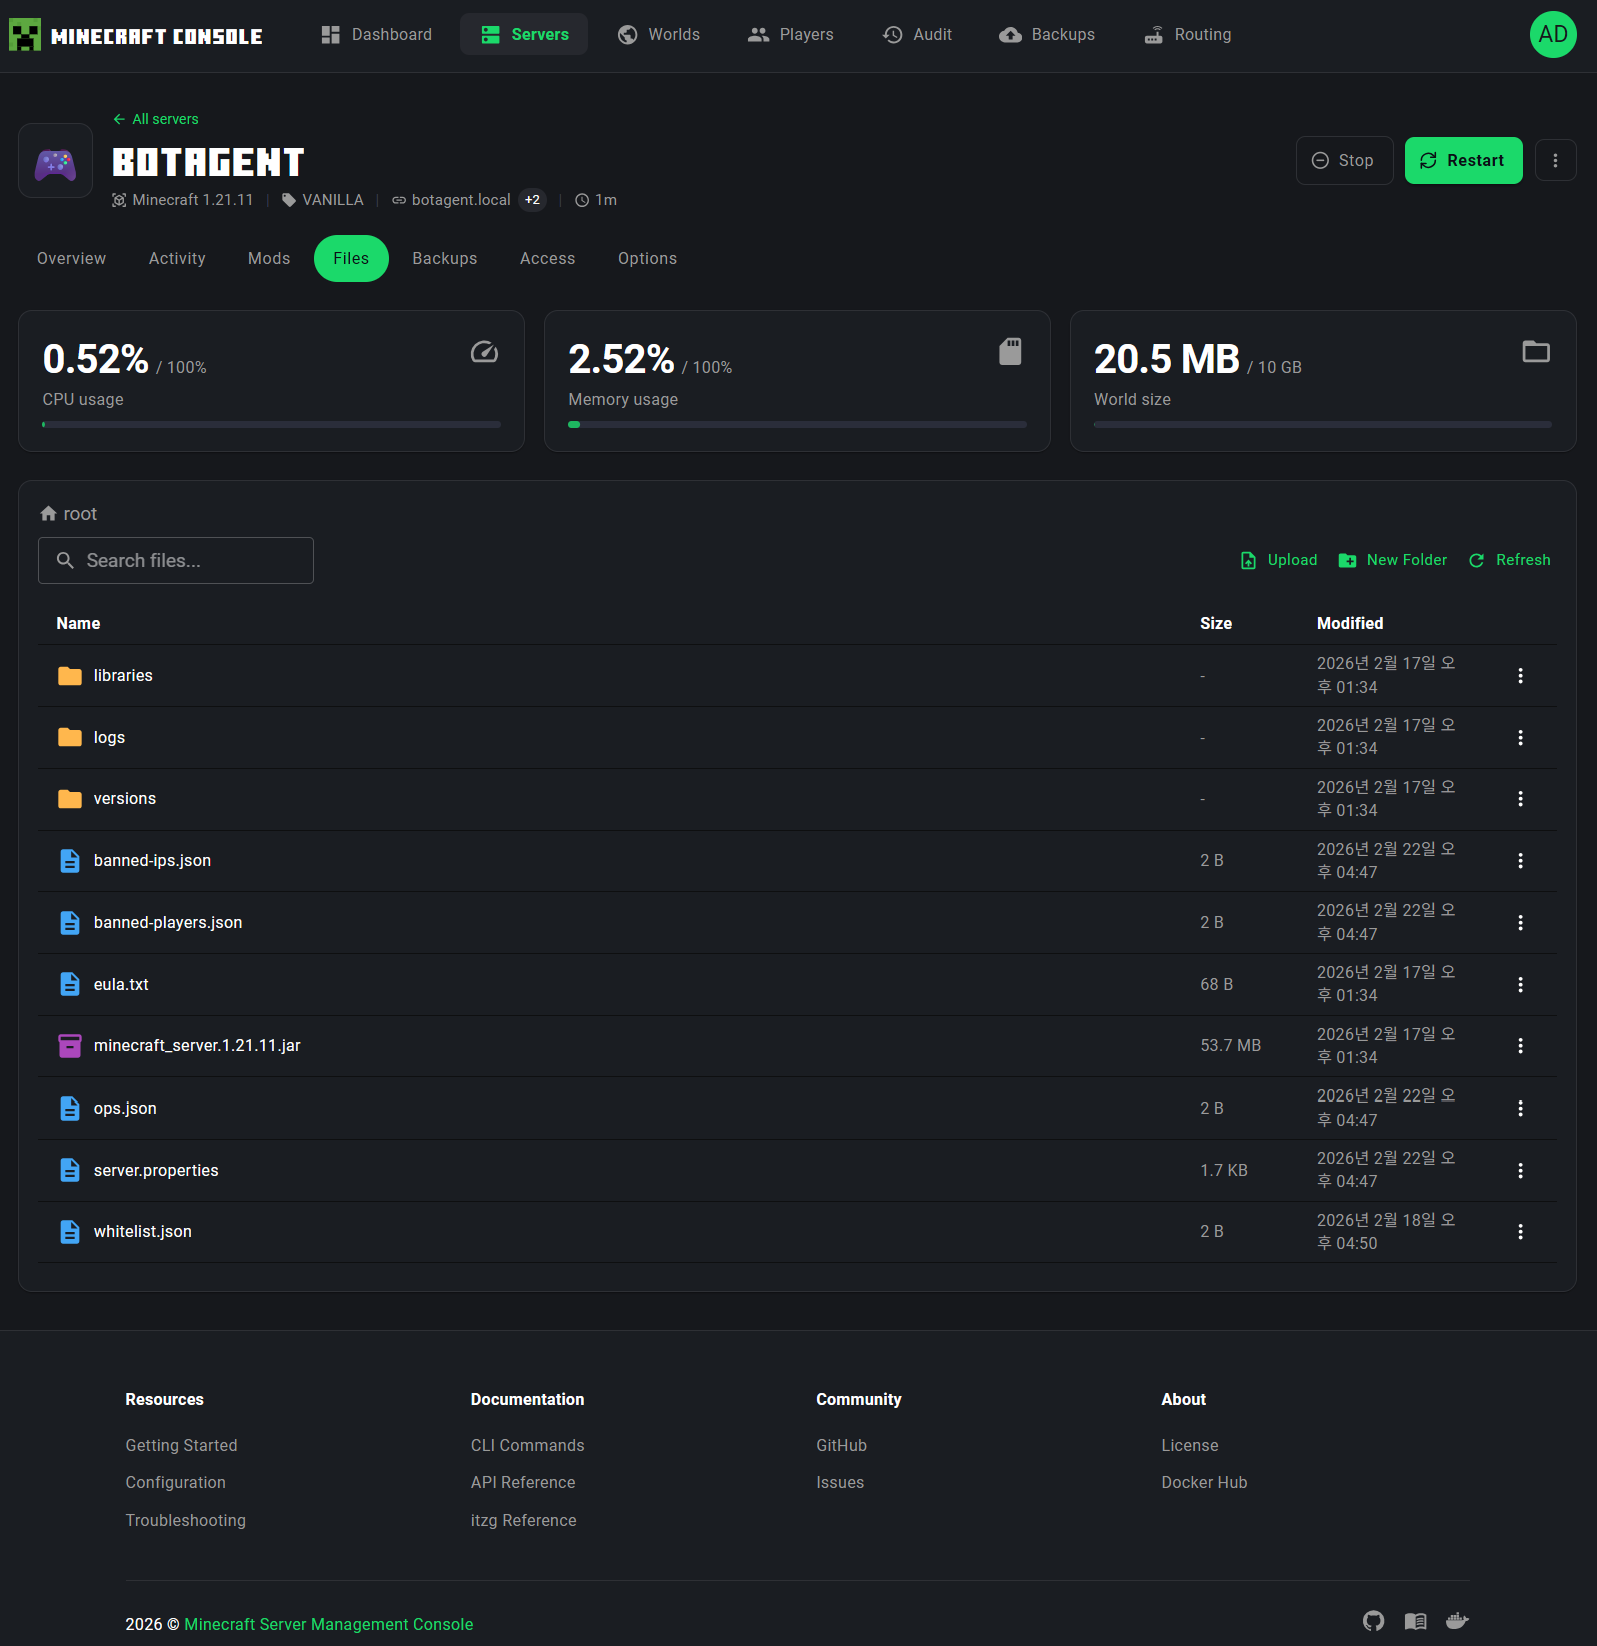
File Browser
The file browser displays the contents of the server's data directory in a familiar list layout:
- Breadcrumb navigation at the top shows your current path (e.g.,
root /) and lets you click to jump to parent directories - Search box to filter files by name within the current directory
- Each file entry shows the file name, size, and last modified date
- Folders are listed first, followed by files
File Operations
The toolbar provides several actions:
| Action | Description |
|---|---|
| Upload | Upload files to the current directory via a drag-and-drop dialog |
| New Folder | Create a new directory in the current path |
| Refresh | Reload the file listing |
Right-clicking or using the context menu on a file provides:
- Rename -- Change the file or folder name
- Delete -- Remove the file with a confirmation dialog
- Download -- Download the file to your local machine
Smart File Editors
The file manager includes intelligent editors that adapt to the file type:
- server.properties -- Opens a specialized form-based editor with categorized settings (see Server Options section)
- Player data files (whitelist.json, ops.json, banned-players.json) -- Opens a dedicated player editor with Mojang API integration for username lookup
- Text files (.txt, .json, .yml, .yaml, .properties, .cfg, .conf, .log, .toml) -- Opens a code editor with syntax awareness
- Other files -- Available for download only
Editing server.properties
When you click on server.properties in the file browser, the system automatically opens the specialized properties editor with both a FORM mode (structured fields) and a RAW mode (plain text editing). This is the same editor available in the Options tab.
Server Options
The Options tab provides a comprehensive configuration editor for your server.
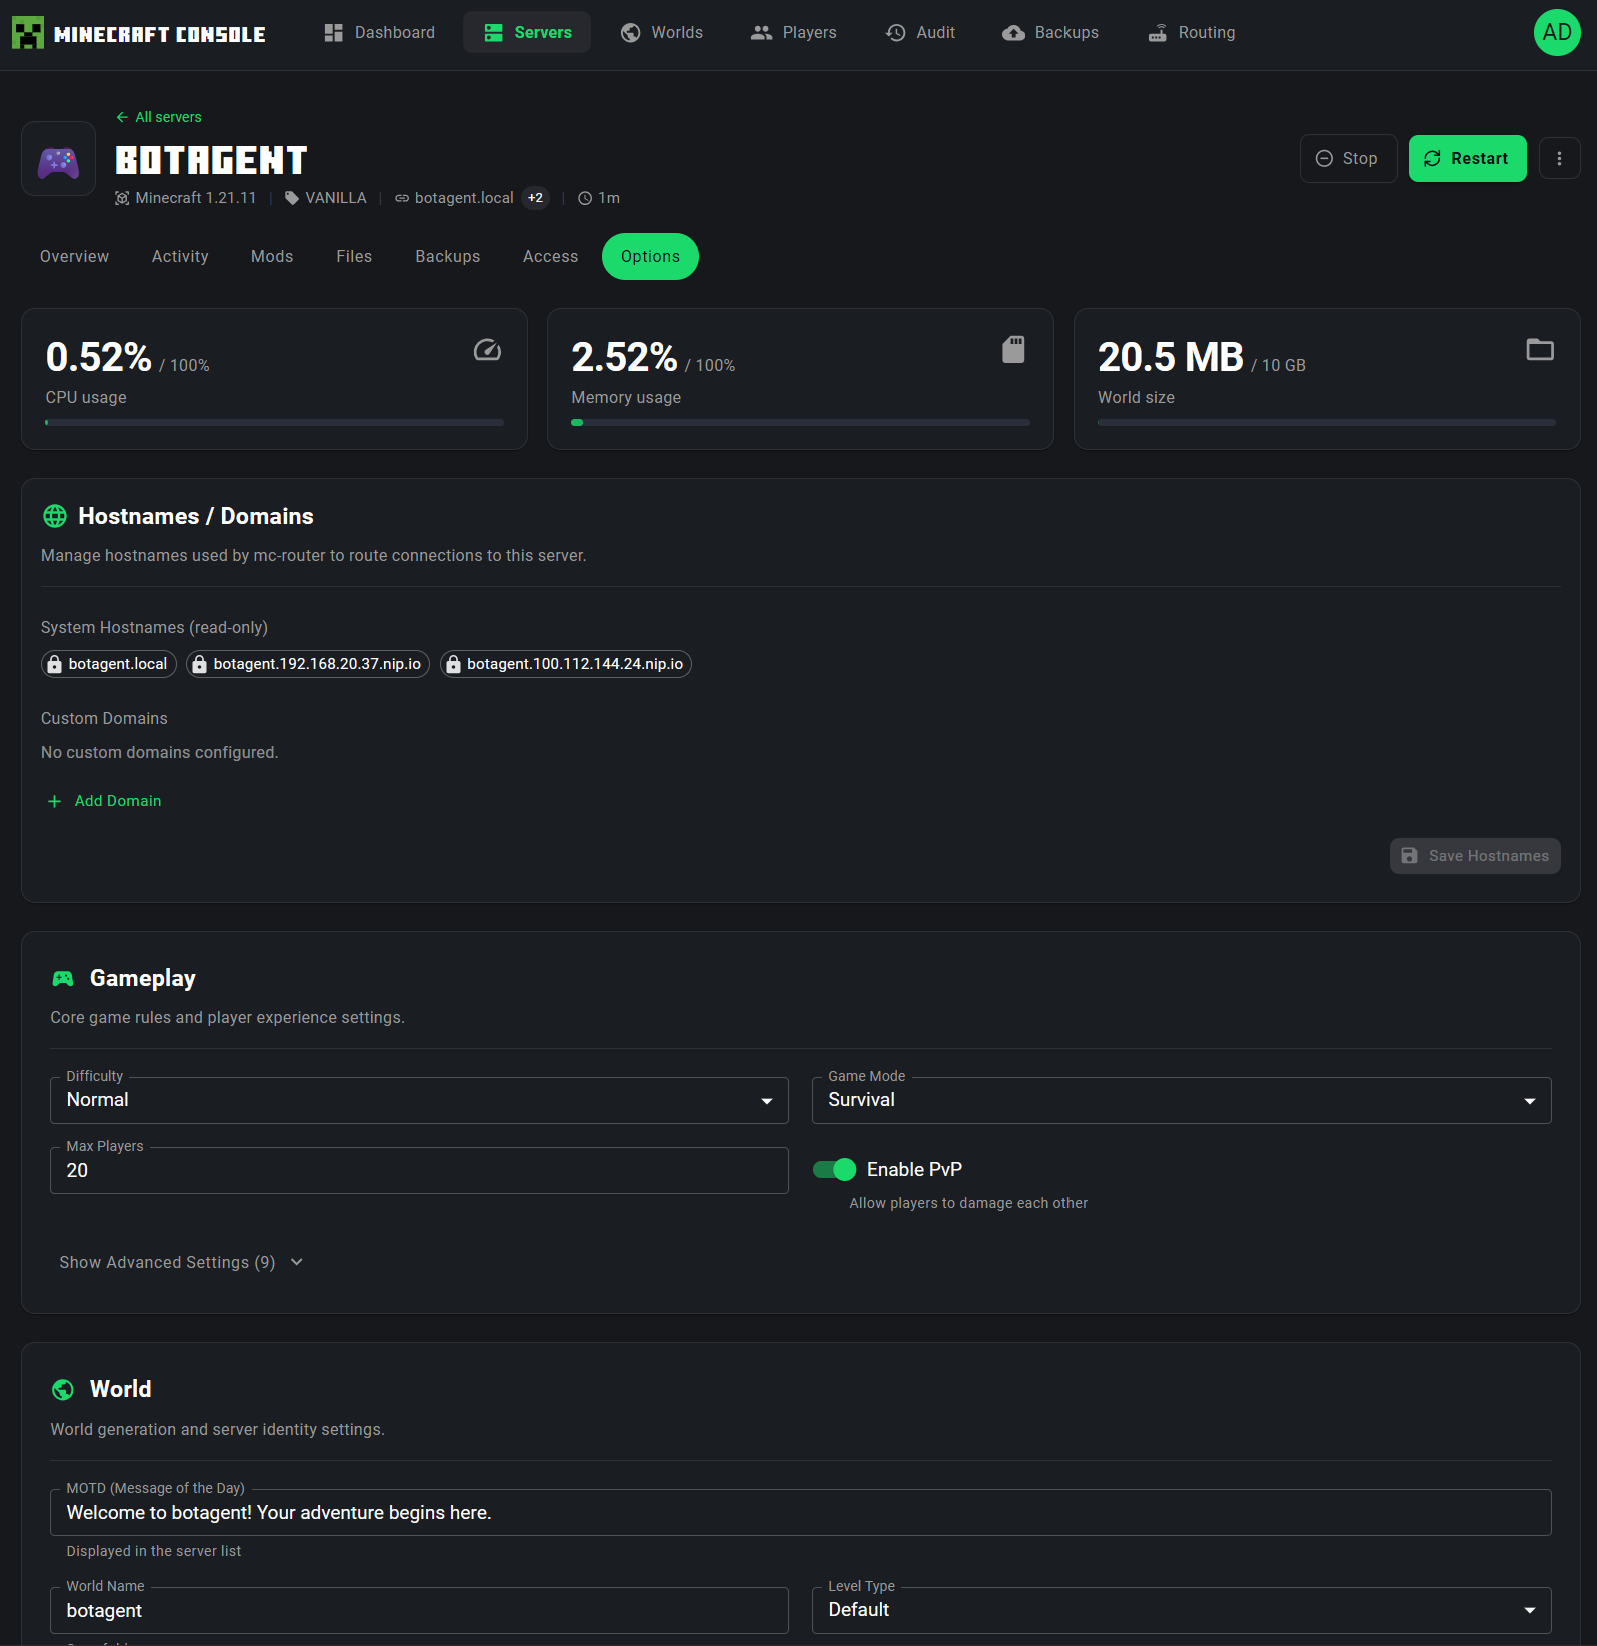
Hostnames / Domains
At the top of the Options tab, the Hostnames / Domains section shows all the hostnames configured for routing connections to this server:
- System Hostnames -- Automatically generated hostnames (e.g.,
botagent.local,botagent.192.168.xx.xx.nip.io) - Custom Domains -- User-defined custom domain names
- + Add Domain button to configure additional custom hostnames
- A Sync Hostnames button to synchronize hostname configuration with the mc-router
Gameplay Settings
The Gameplay section lets you configure core game rules and player experience:
| Setting | Description |
|---|---|
| Difficulty | Normal, Easy, Hard, or Peaceful |
| Game Mode | Survival, Creative, Adventure, or Spectator |
| Max Players | Maximum number of concurrent players |
| Enable PvP | Whether players can damage each other |
A Show Advanced Settings toggle reveals additional options like spawn protection radius, entity broadcasting range, and more.
World Settings
The World section controls world generation and server identity:
| Setting | Description |
|---|---|
| MOTD (Message of the Day) | The welcome message shown in the Minecraft server browser |
| World Seed | The seed used for world generation |
| World Name | The name of the world directory |
| Level Type | World generation type (Default, Flat, etc.) |
Additional Setting Categories
Expanding the advanced settings reveals more configuration sections:
- JVM / Performance -- Memory allocation, Aikar's flags, JVM options
- Network -- Online mode, RCON settings, port configuration
- Advanced -- Auto-pause, auto-stop, timezone, UID/GID settings
Save and Restart
When you modify settings:
- A sticky action bar appears at the bottom of the page showing how many fields have changed
- Click Save to apply the changes
- If any changed setting requires a server restart (e.g., memory, online mode, world settings), a Restart Confirmation Dialog appears asking whether to restart now or later
- Click Reset to discard unsaved changes
Restart Required
Some settings (like memory allocation, online mode, and world seed) require a server restart to take effect. The UI clearly indicates which settings need a restart after being changed.
Player Management
The Players page provides comprehensive management of players across all your servers.
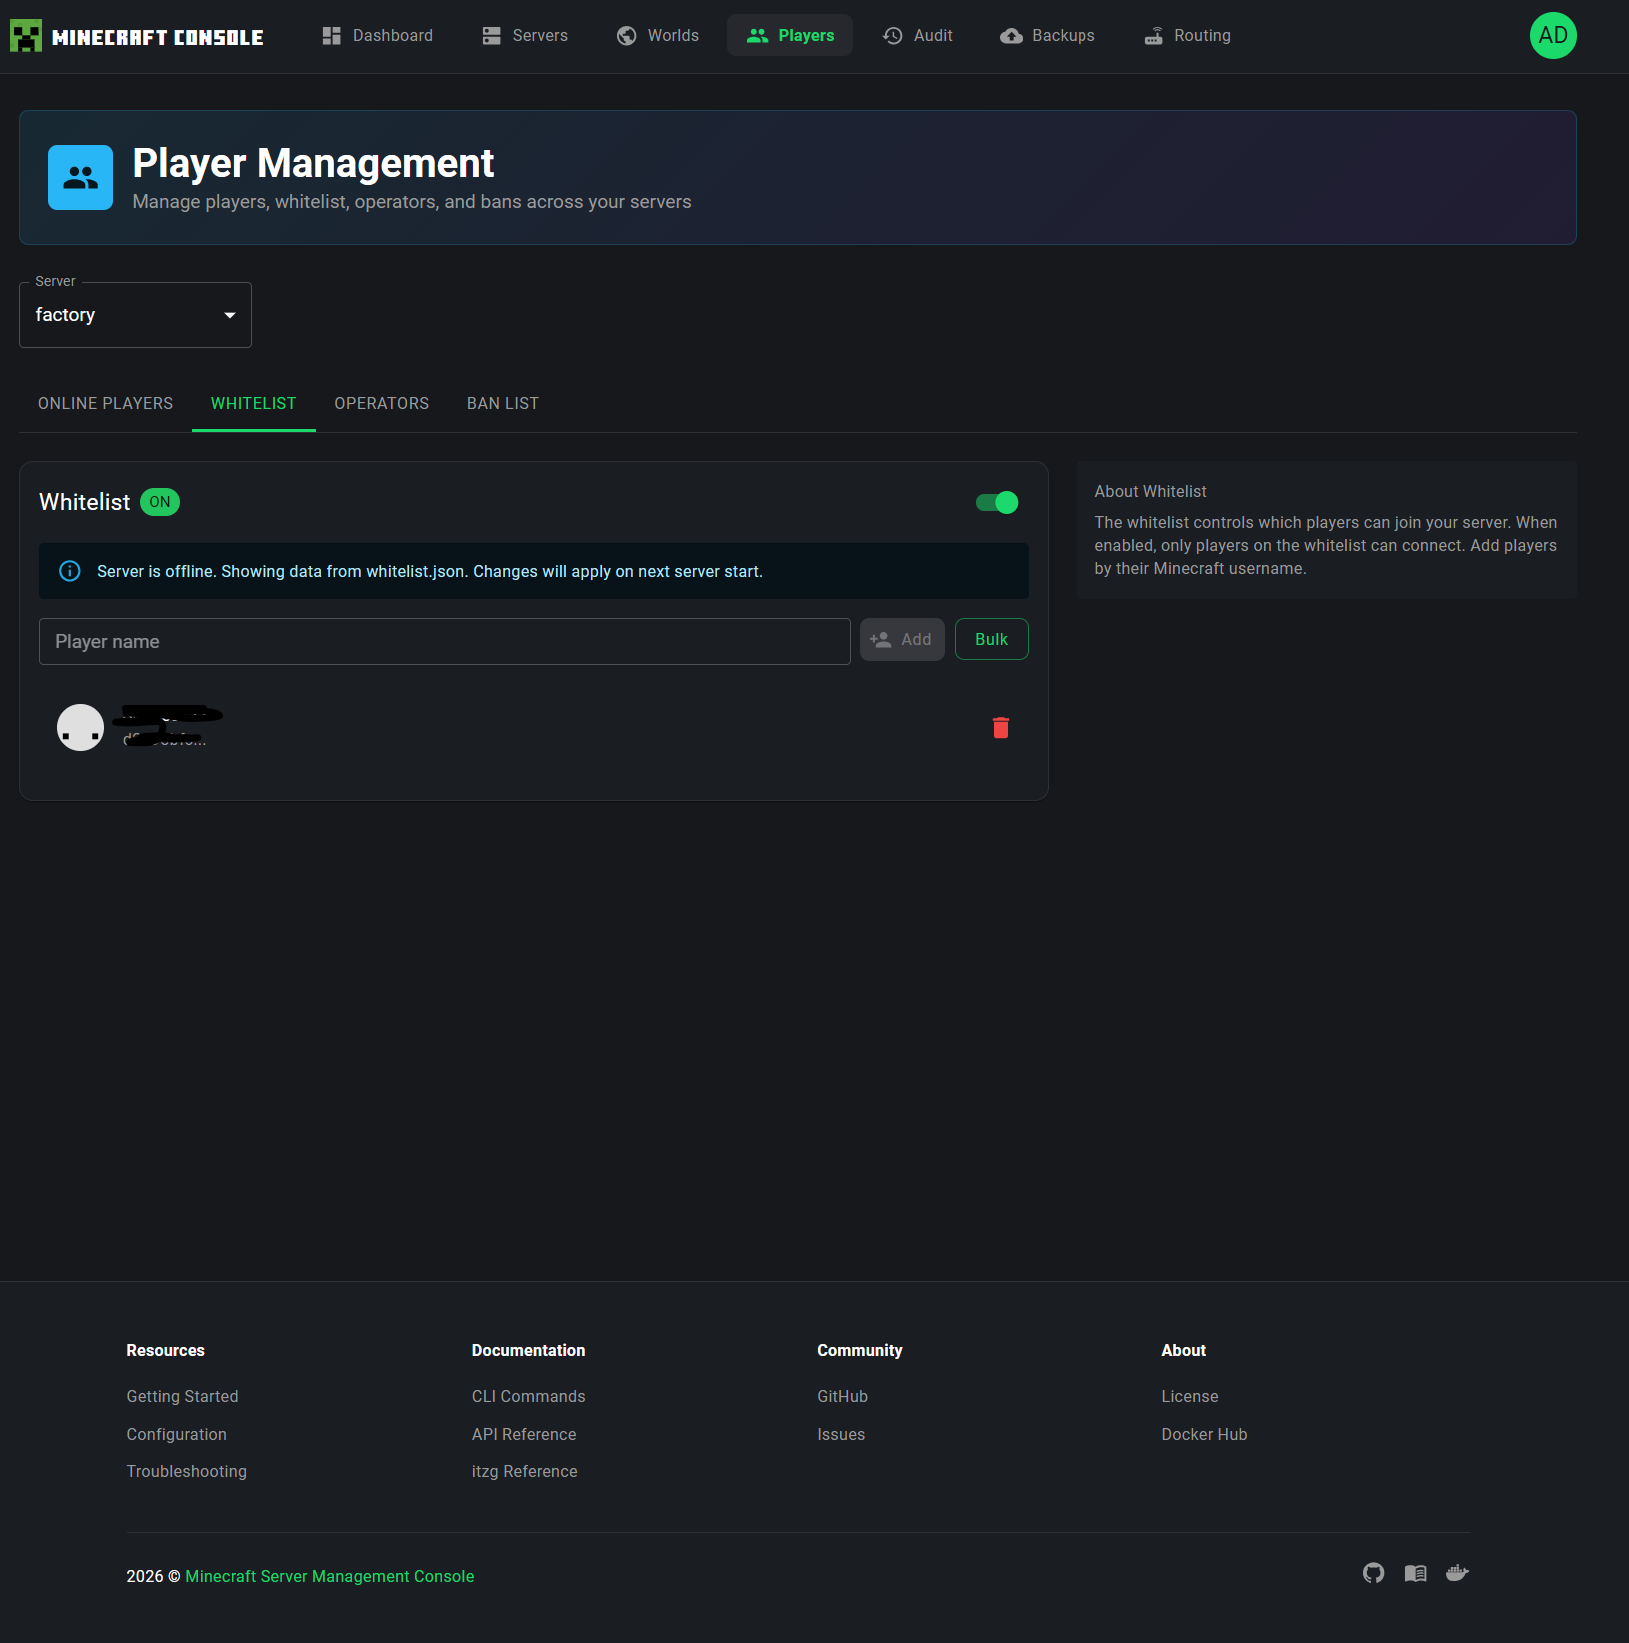
Server Selector
At the top of the page, a Server dropdown lets you select which server to manage. The selected server determines which player data is displayed in all tabs below.
Tabs
The Player Management page is organized into four tabs:
Online Players
Shows players currently connected to the selected server. When the server is running, this displays real-time player information.
Whitelist
Manage which players are allowed to join your server:
- Whitelist toggle -- Enable or disable the whitelist (shown as an ON/OFF switch)
- Player input field -- Enter a Minecraft username to add to the whitelist
- Add button -- Add a single player
- Bulk button -- Add multiple players at once
- Player list -- Shows all whitelisted players with their Minecraft avatar and a remove button
Offline Server Data
When a server is offline, the Players page reads data directly from the server's JSON files (whitelist.json, ops.json, banned-players.json). An informational banner indicates: "Server is offline. Showing data from whitelist.json. Changes will apply on next server start."
Operators
Manage players with operator (admin) privileges:
- Add players as operators with configurable permission levels (1-4)
- Level 1: Can bypass spawn protection
- Level 2: Can use /clear, /gamemode, etc.
- Level 3: Can use /ban, /kick, /op, etc.
- Level 4: Can use /stop, full access
An information panel on the right explains each OP level in detail.
Ban List
Manage banned players:
- Ban players by username with an optional reason
- View all currently banned players
- Pardon (unban) players with a single click
- An information panel explains how bans work
Worlds
The Worlds page lets you manage all Minecraft worlds stored in your platform.
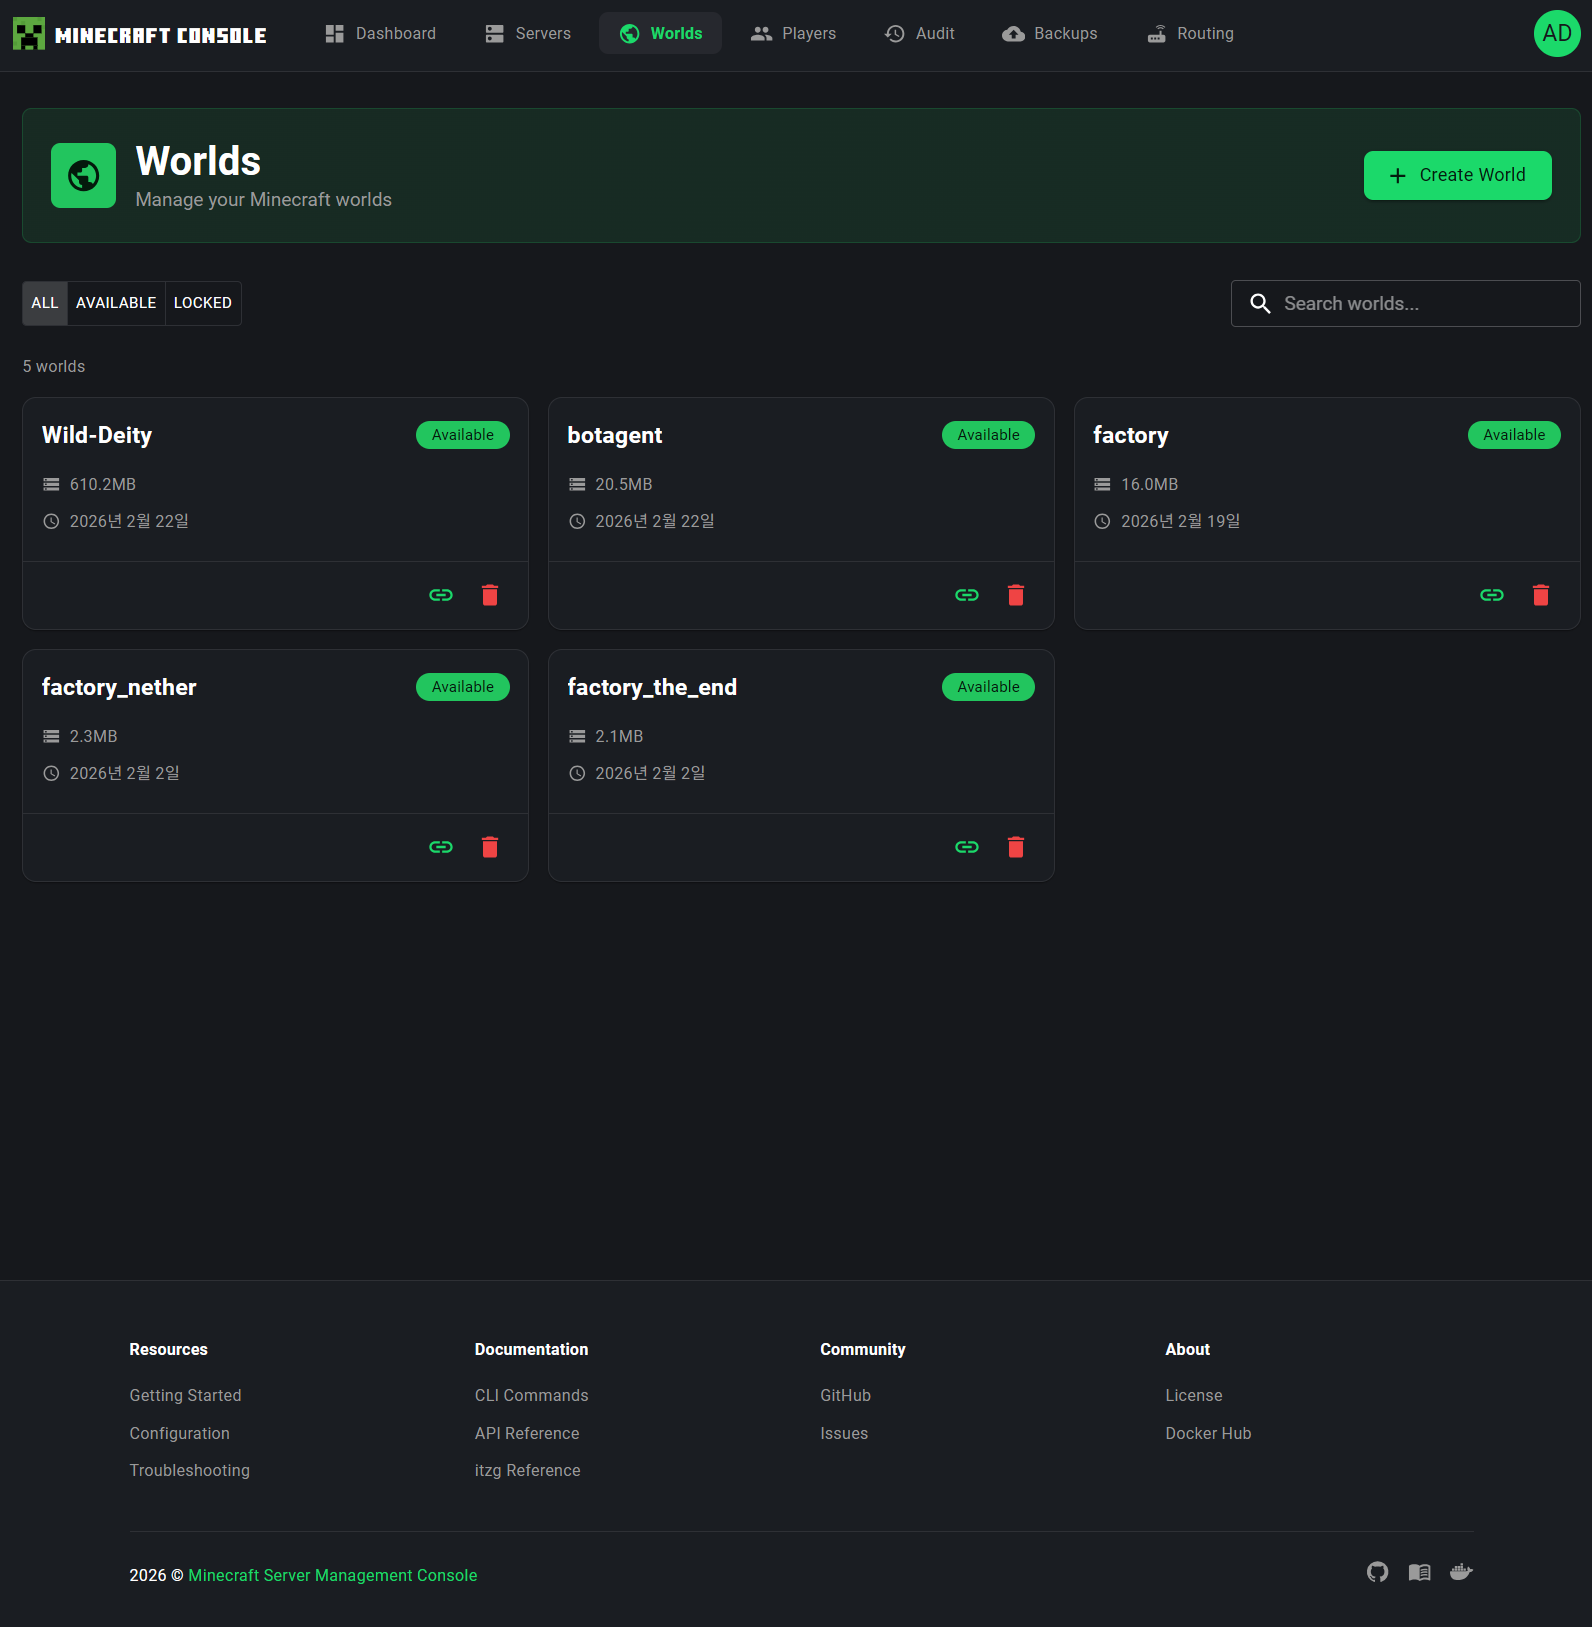
World List
Worlds are displayed as cards in a grid layout. Each world card shows:
- World name (e.g.,
Wild-Deity,botagent,factory) - Status badge --
Available(green) for unlocked worlds,Lockedfor worlds currently assigned to a server - Size -- Disk space used by the world (e.g.,
610.2MB,20.5MB) - Date -- When the world was created or last modified
- Action buttons:
- Link icon -- Assign the world to a server
- Delete icon (red trash can) -- Delete the world
Filtering and Search
At the top of the page:
- ALL -- Show all worlds
- AVAILABLE -- Show only available (unlocked) worlds
- LOCKED -- Show only worlds currently assigned to a server
A Search box lets you filter worlds by name.
Creating a New World
Click + Create World in the page header to open the creation dialog:
- Enter a World name
- Optionally specify a Seed for world generation
- Click Create
Assigning a World to a Server
Click the link icon on a world card to open the assignment dialog. Select a server from the list of available (non-running) servers and confirm the assignment. The world will be linked to that server and marked as Locked.
Deleting a World
Click the red trash can icon on a world card. A confirmation dialog appears requiring you to type the exact world name to prevent accidental deletion. This action is irreversible.
Data Loss
Deleting a world permanently removes all world data including terrain, player builds, and entities. Always create a backup before deleting a world.
Backups
The Backups page manages world backups and automated backup schedules.
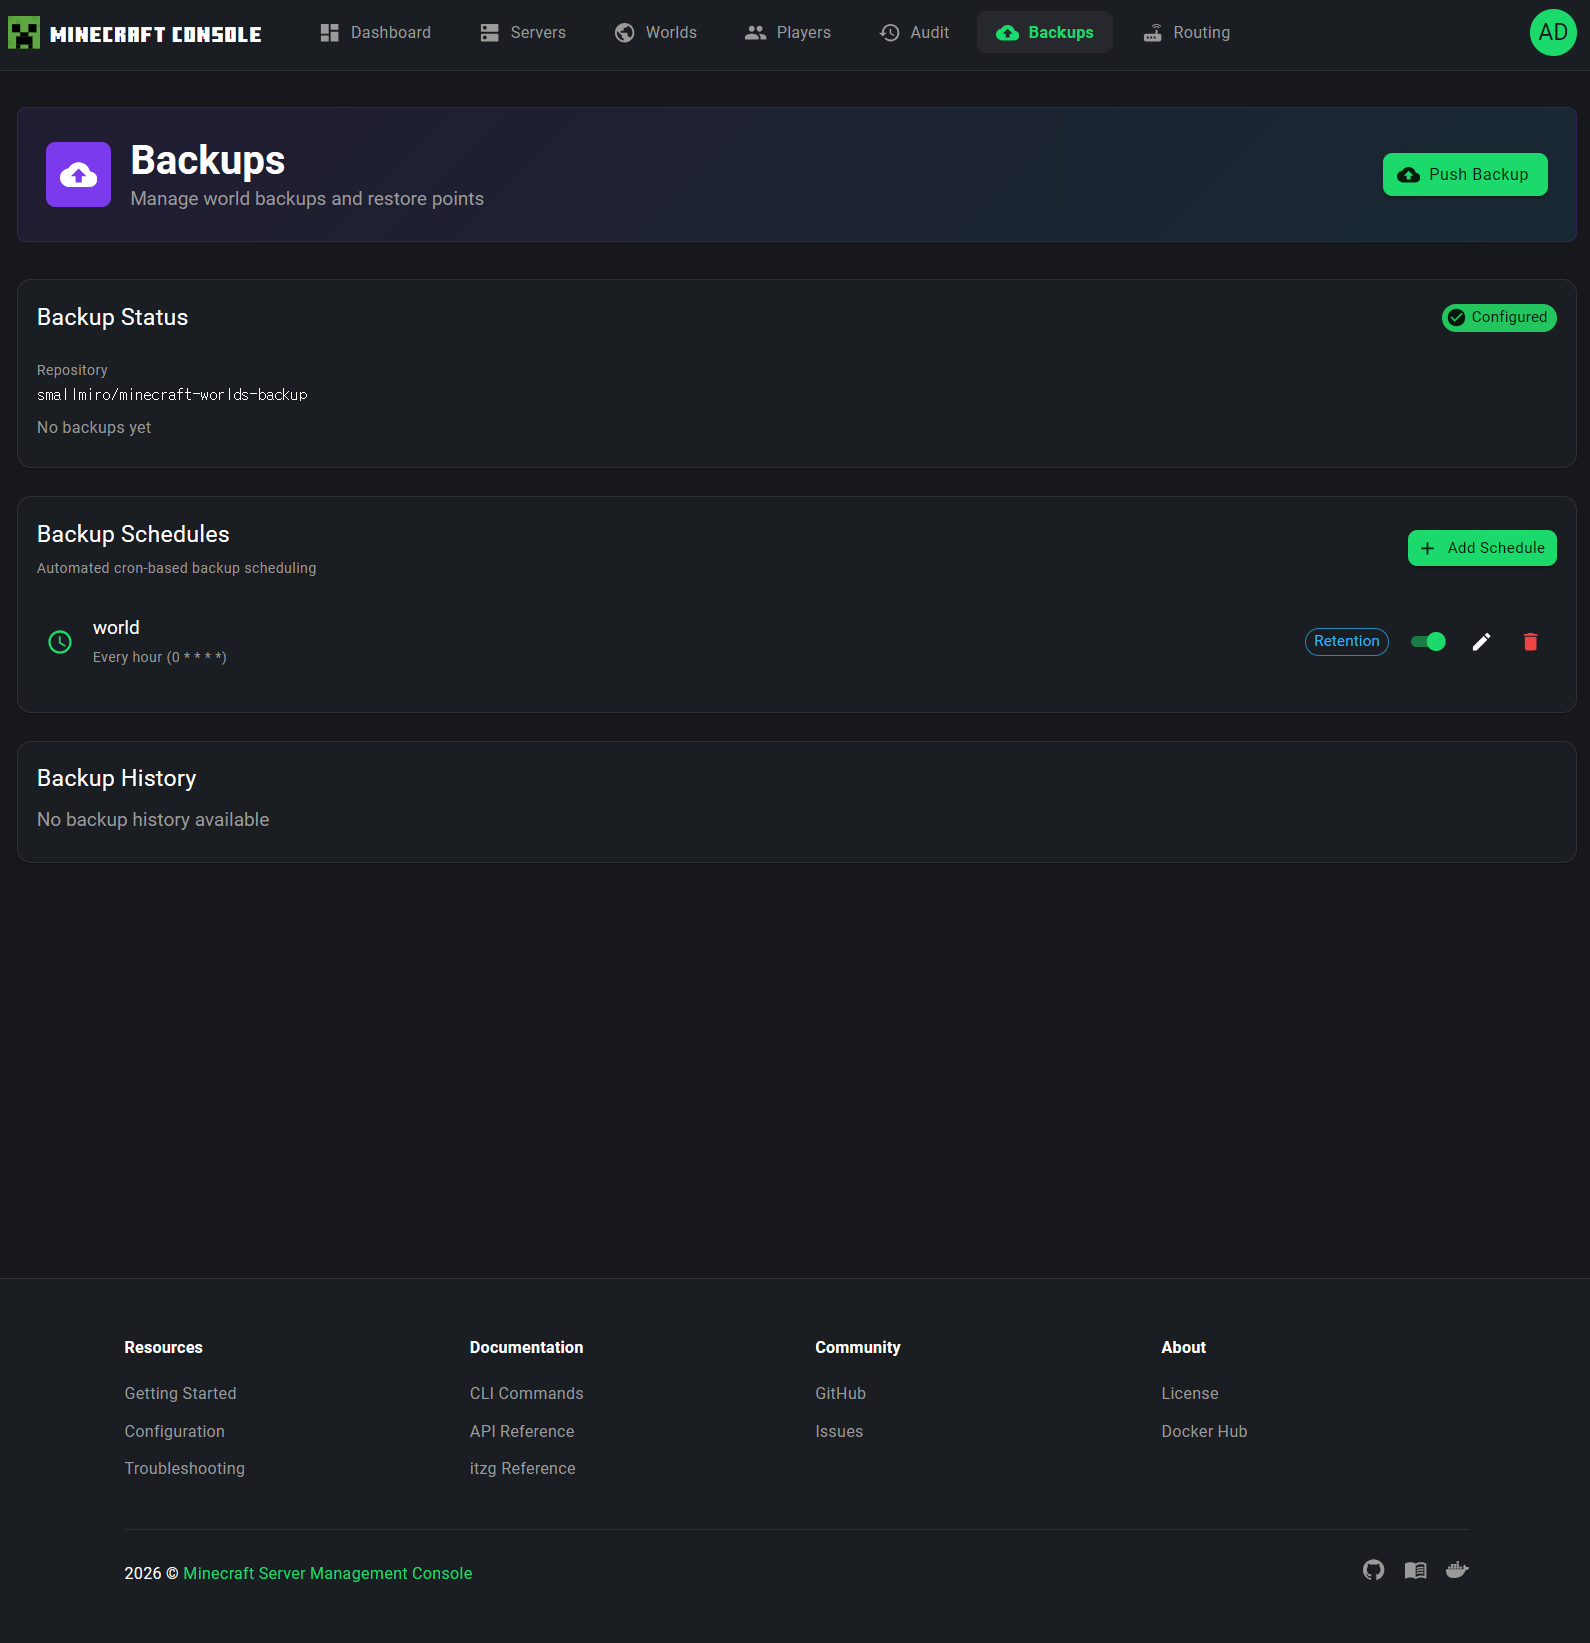
Backup Status
The top section shows the current backup configuration:
- Repository -- The configured Git repository for backup storage (e.g.,
smallmiro/minecraft-worlds-backup) - Status -- Whether the backup system is
Configured(green checkmark) or not - Backup count -- Number of existing backups
Push Backup
The Push Backup button in the page header triggers an immediate manual backup of all worlds to the configured Git repository.
Backup Schedules
The Backup Schedules section manages automated cron-based backup scheduling:
- Each schedule shows the world name, frequency (e.g., "Every hour"), and the cron expression
- Retention badge -- indicates whether backup retention policies are configured
- Toggle switch -- Enable or disable individual schedules
- Edit button (pencil icon) -- Modify the schedule
- Delete button (trash icon) -- Remove the schedule
- + Add Schedule button to create new automated backup schedules
Backup History
The Backup History section (visible when the backup system is configured) shows a log of past backup operations, including timestamps, status, and any errors.
Audit Log
The Audit Log page provides a comprehensive activity log for all management operations performed across your servers.
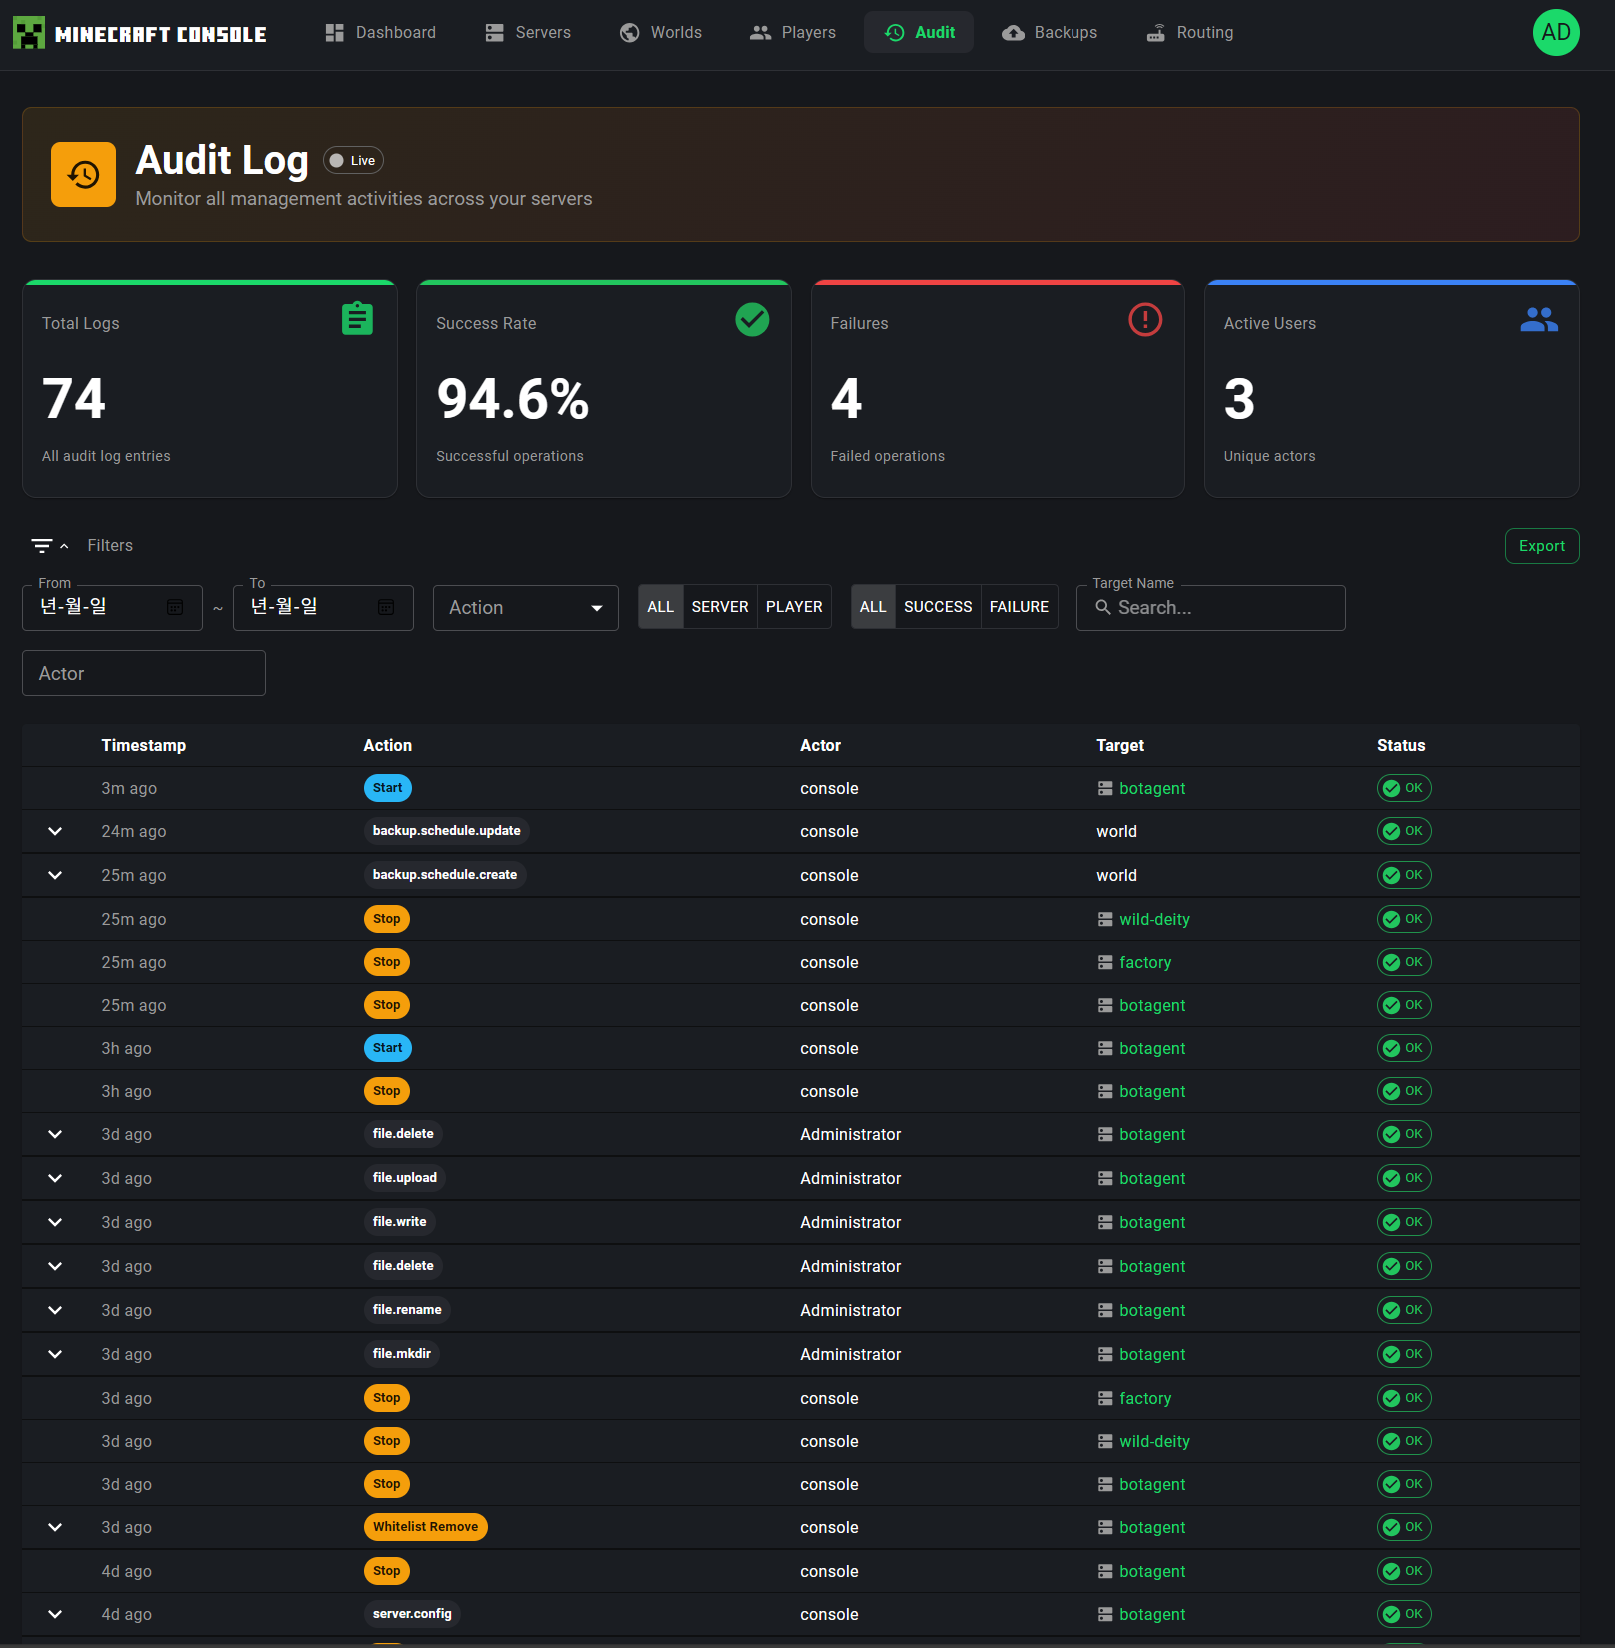
Live Monitoring
The Audit Log features a Live indicator in the page header showing the real-time SSE connection status:
- Green dot with "Live" -- Connected and receiving real-time events
- Gray dot with "Offline" -- SSE connection lost (auto-reconnects)
When new audit events arrive while you are viewing the page, a notification banner appears: "X new logs available - Click to refresh."
Statistics Overview
Four statistics cards at the top provide summary metrics:
| Card | Description |
|---|---|
| Total Logs | Total number of audit log entries |
| Success Rate | Percentage of successful operations |
| Failures | Count of failed operations |
| Active Users | Number of unique actors who performed actions |
Filters
The Audit Log provides powerful filtering capabilities:
- Date range picker -- Filter by start and end dates
- Action filter -- Filter by specific action types (e.g.,
server.start,server.stop,backup.schedule.create) - Target type filter -- Filter by target category: ALL, SERVER, PLAYER
- Status filter -- ALL, SUCCESS, FAILURE
- Actor filter -- Search by the name of the user who performed the action
- Export button -- Export filtered audit data
Log Table
The main table displays audit entries with the following columns:
| Column | Description |
|---|---|
| Timestamp | When the action was performed (relative time like "21m ago") |
| Action | The action type with a color-coded badge |
| Actor | Who performed the action (username) |
| Target | The server, world, or resource affected |
| Status | Success (green) or Failure (red) indicator |
Click on any row to open a Detail Drawer with full information about the audit entry, including request metadata, IP address, and the complete action payload.
Export
Click the Export button to open the export dialog, which allows you to download audit data in various formats based on your current filter selection.
Routing
The Routing page gives you full visibility and control over your network routing configuration.
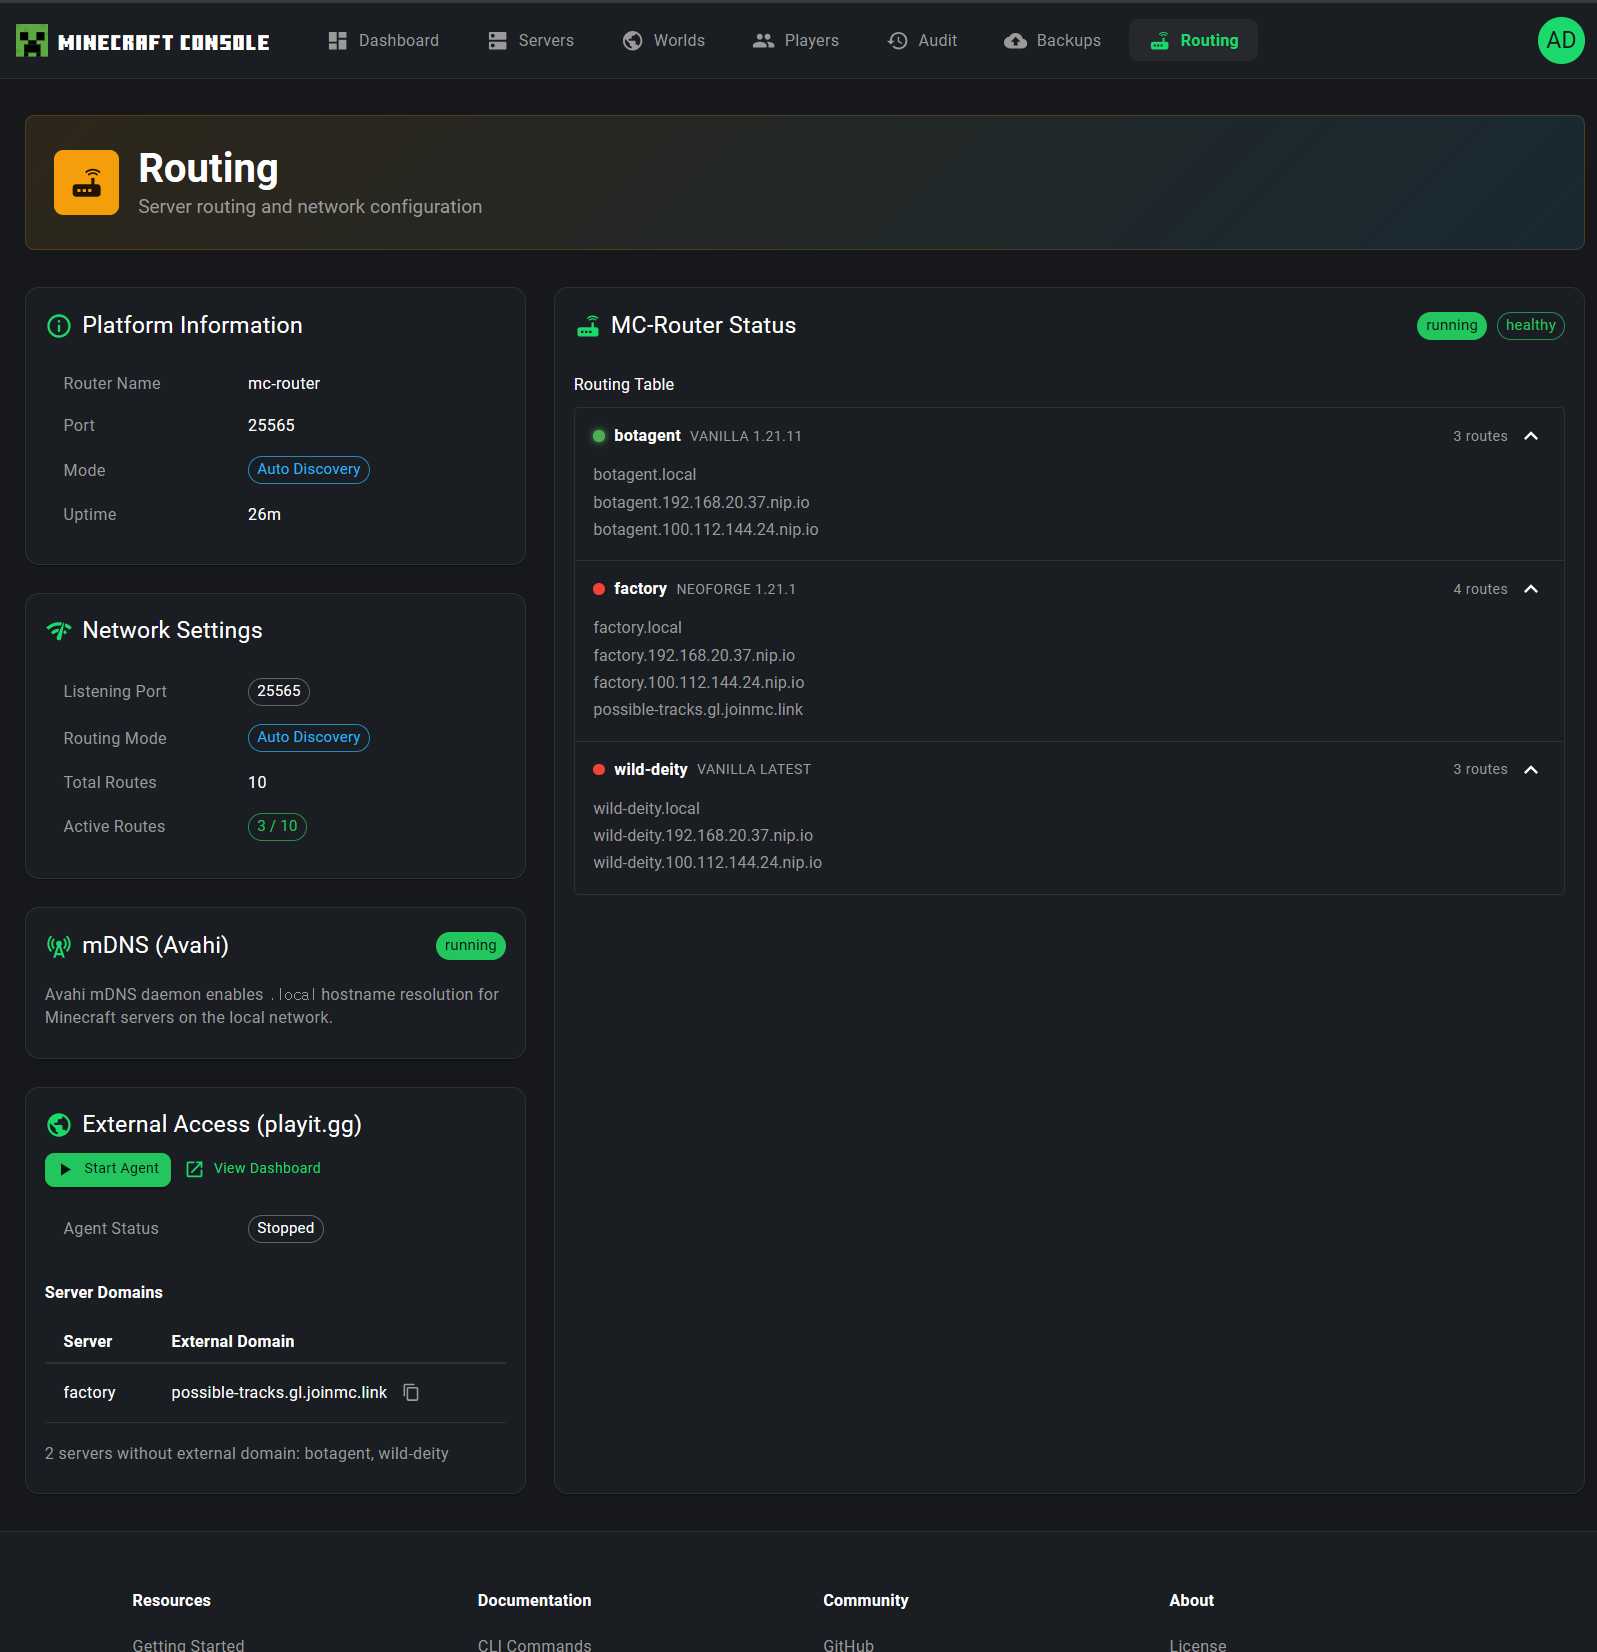
Platform Information
The left panel shows Platform Information about your mc-router setup:
| Field | Description |
|---|---|
| Router Name | The mc-router container name |
| Port | The listening port (default: 25565) |
| Mode | Routing mode (e.g., Auto Discovery) |
| Uptime | How long the router has been running |
Network Settings
The Network Settings card displays:
- Listening Port -- The port mc-router listens on
- Routing Mode -- How hostnames are resolved (e.g.,
Auto Discovery) - Active Routes -- Number of active routing entries
MC Router Status
The right panel shows the MC Router Status with a live routing table:
- Healthy / Unhealthy status indicators
- For each server, the routing table displays:
- Server name with its Minecraft version
- Number of configured routes
- All hostname mappings (e.g.,
botagent.local,botagent.192.168.xx.xx.nip.io)
mDNS (Avahi) Status
The mDNS (Avahi) card shows whether the Avahi mDNS daemon is active, enabling .local hostname resolution for Minecraft clients on the local network.
External Access (playit.gg)
The External Access section manages playit.gg tunnel configuration for making your servers accessible from the internet without port forwarding:
- Start Agent / Auto Dashboard buttons for managing the playit agent
- Agent Status -- Running or Stopped
- Server Domains table showing which servers have external domains configured (e.g.,
possible-tracks.gl.joinmc.link) - Status information for servers without external domains
Navigation
The top navigation bar is consistent across all pages and includes:
| Item | Description |
|---|---|
| MINECRAFT CONSOLE logo | Click to return to the Dashboard |
| Dashboard | Infrastructure overview |
| Servers | Server management |
| Worlds | World management |
| Players | Player management |
| Audit | Activity audit logs |
| Backups | Backup management |
| Routing | Network routing configuration |
| User avatar (top-right) | Account settings, theme toggle, and sign out |
The currently active page is highlighted in the navigation bar.
Best Practices
Security
- Use Strong Passwords -- Follow the password requirements during
mcctl console init - Limit Access -- Use the Access tab to grant minimal permissions to each user
- Use HTTPS -- Configure a reverse proxy with SSL for production deployments
- Review Audit Logs -- Regularly check the Audit Log for unexpected activity
Server Management
- Monitor the Dashboard -- Check server health, player counts, and recent activity regularly
- Graceful Shutdowns -- Always use the Stop button instead of force-killing containers
- Backup Before Changes -- Push a backup before modifying server configuration or world data
- Use Scheduled Backups -- Configure automated backup schedules for peace of mind
Performance
- Avoid Simultaneous Operations -- Don't start/stop multiple servers at once
- Monitor Resource Usage -- Use the resource stat cards on the server detail page to track CPU and memory
- Clean Up Unused Worlds -- Delete worlds that are no longer needed to free disk space
Troubleshooting
Can't Access the Console
-
Check Service Status:
-
Verify Port:
-
Check Logs:
Login Fails
-
Verify Credentials:
-
Reset Password:
Server Status Not Updating
-
Check API Health:
-
Verify Docker Socket: Ensure Docker is running and the mcctl-api process has access to the Docker socket.
-
Check Network: Ensure mcctl-console can reach mcctl-api on port 5001.
Commands Not Working
- Server Must Be Running -- RCON commands only work when the server is in a
runningstate - RCON Must Be Enabled -- Ensure RCON is enabled in the server configuration
- Check API Logs:
Mobile Access
The web console uses a responsive Material UI layout that adapts to different screen sizes:
- Phone -- Simplified card layout with collapsible navigation
- Tablet -- Full dashboard with optimized touch controls
- Desktop -- Full feature set with side-by-side panels
Mobile Tips
- Use landscape mode for better command input in the console
- The navigation collapses into a hamburger menu on small screens
- All dialogs are full-screen on mobile for easier interaction